Rifle scope installation can be intimidating, but it’s a simple task. They are just one accessory that can really help improve your aim. While there is other equipment you can add to your rifle to increase your accuracy (read more here), for the moment though, let’s just focus on scopes. This post will give you a basic overview of mounting systems, with pros and cons of each.
I’ll walk you through setting eye relief, and will discuss scope level and why it’s important.
Follow these easy steps and you’ll be ready for the range in no time!
The Basics of Scope Bases
There are three main types of bases for installing telescopic sights on your rifle:
- Direct
- Dovetail
- Picatinny
Direct Mount
I showed you my direct mounts in the video above. As the name suggests, the scope ring bases are mounted directly on the action. They are super stable for keeping the scope riveted to the action (just kidding, they are screwed onto the gun, not riveted).
A downside of the direct mounting system-you can’t switch your rifle scope quickly. But if you don’t need to remove and replace the scope often, this is one of the best set-ups for your precision rifle.
Dovetail Mount
The picture at the top of this blog is a dovetail mount: a March scope on our Jay Young rail gun for the unlimited class. (I’ll do another blog and show it to you-it’s cool.)
Because you don’t need to take the rifle scope out of the rings, the dovetail mount makes it easy to remove and re-install the rifle scope, you’d even be able to swap out your scope for a completely different optic such as this Holosun hs510c or similar, should you be going for shorter ranges-with no change in point of impact.
Downside to the dovetail mount: if you don’t tighten the bases, the scope will walk forward with recoil.
Picatinny Rail
The Picatinny mount is standard platform with multiple slots / recoil lugs machined perpendicular to the rail, and similar to the earlier Weaver rail mount. The Weaver rail is based on the dovetail mount, with transverse slots.
The concept was adopted by the U.S. military and is the standard now in rail-grabbing optics mounts. The standardized mounting system is what makes this shine. Slots are numbered so you can re-mount a scope with no change in point of impact.
If you want to learn more about the history and features of the Picatinny rail, check out this Shooting Times article Rail Crazy: Picatinny Rail Basics:
You can purchase a Picatinny rail with Minute of Angle (MOA) adjustment for long-range shooting. Many rifle scope set-ups will reach their limit around 600 yards and require additional MOA adjustment machined into the scope base. For more information I suggest you read this excellent blog post by Warne Scope Mounts:
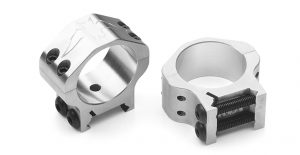
To the left are Picatinny rail scope rings available from BAT Machine. The actions you see in my videos are made by Bruce Thom at BAT. As an aside, Bruce can machine direct-mount ring bases with MOA adjustment for long-range shooting.
These scope rings are machined from aircraft grade aluminum which provides strength, while being light and less likely to crush the scope tube.
The split rings are machined from a single piece-so don’t mix and match the bases and tops. Some manufacturers like Kelbly’s mark their rings to help you keep them matched.
Establishing Rifle Scope Eye Relief
Follow the instructions included with the scope base and rings for installation on your action, paying attention to torque settings.
Mount your rifle scope as far forward as possible. It’s not fun to get hit in the forehead with a scope traveling at recoil velocity!
Tighten the scope ring tops so there is slight friction on the tube. The scope should slide in the rings, but be tight enough to stay in place after adjustment.
Set the rifle in a stable position, preferably on a bag rest. Shoulder the gun in a normal shooting position, and slowly move the scope to the rear just until you can see a full field of view.
Check Your Scope for Level
Without disturbing the optimal eye relief position, rotate the scope to true the reticle level (with the elevation adjustment dial at the top of the scope).
Check to be sure that the vertical hair of the reticle is in alignment with the vertical axis of the firearm. You can do this with a bubble attached to the scope, but it’s easy to trust your eye to plumb the scope.
To confirm, slowly move the rifle stock backwards and forwards in the rest while looking through the scope. The vertical reticle should run up and down without canting. If the reticle is at an angle, the bullet point of impact won’t be consistent. If you need further tips on scope adjustment you can click the following link: https://riflescopescenter.com/adjust-elevation-windage-parallax/.
When you’re satisfied with both eye relief and level, then tighten the ring screws evenly and securely. Use a pattern, like you would when tightening lug nuts on a wheel rim, and don’t over-tighten the rings (you risk crushing the scope tube).
Considering scopes for you firearm, then you should take a look at the best night vision scopes as reviewed by Outdoor Empire. Night vision scopes make hunting, target shooting, security and tactical work at night a breeze.
Now you’re ready for the range!

![]()